 Integrated
  Shared
  Task
Task  Cloud
Cloud  Shared
  Powerful
  Support
  Tutorials
  Trouble
  Hints
Hints  Frequently
  Contact
 How to create, edit
and delete users
MyOffice is a multi-user system in which data, in the form of calendars, contact groups, task lists, note groups, file groups, and email folders, can be shared with users who're part of your account. So, in order to share data with your colleagues, you'll need to create MyOffice users for them as part of your account.
In order to access the user admin functionality, you'll need to connect as a user who's got User Admin permission. The user you created when you signed up will have User Admin permission.
For the purposes of these walkthroughs we'll be using the MyOffice Windows app. However, full user admin functionality is available in the Mac, Android, iPhone, and web apps, so you can work with users no matter what device you're using.
OPENING USER ADMIN
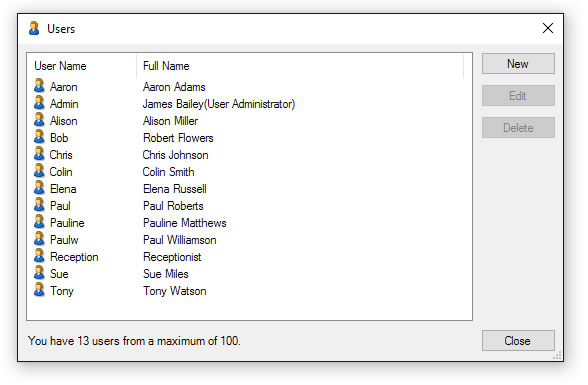
In the Windows app, open the "Tools" menu and click "User Admin". The "Tools" menu can be found in the main windows - calendars, contacts, tasks, file store, notes, and email. You'll need to be online and connected to the internet in order to open the User Admin window. When the window opens, it should look rather like the screenshot below, albeit with your account's users in it.
CREATING A USER
To create a new user, either click the "New" button, or select "New" from the context menu (found by right clicking on the list of users). If the "New" button isn't highlighted, you may need to purchase more users. The number of users you currently have, and your account's current maxiumum is shown at the bottom of the user admin window. In the above example - a trial account - we've used 13 out of a possible 100 users.
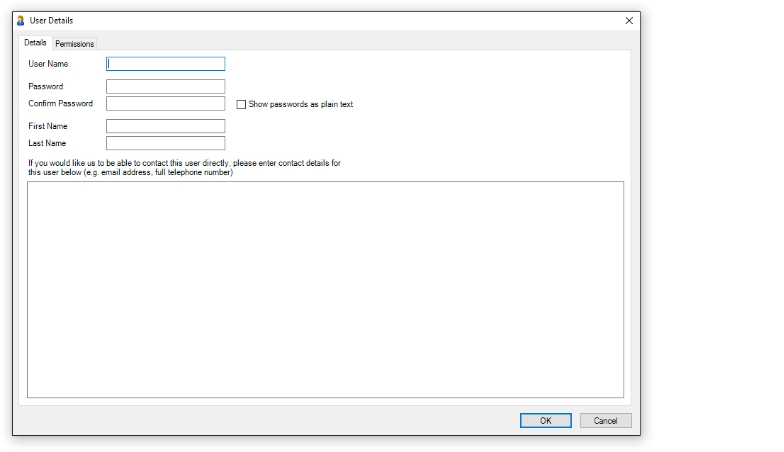
Pictured above is the user details dialog with the "Details" tab on top. This tab allows you to enter the user's "User name" and "Password" which they will use to when logging on to MyOffice. The "First Name" and "Last Name" fields are purely cosmetic, and are used for easier identification of users within the system.
Once you've entered the basic details into the "Details" tab, click the "Permissions" tab to change what the user's allowed to do. If you're just trialing MyOffice and merely want to create a few users to experiment with, feel free to skip the "Permissions" tab for now as it's only really important when come to use your account for real.
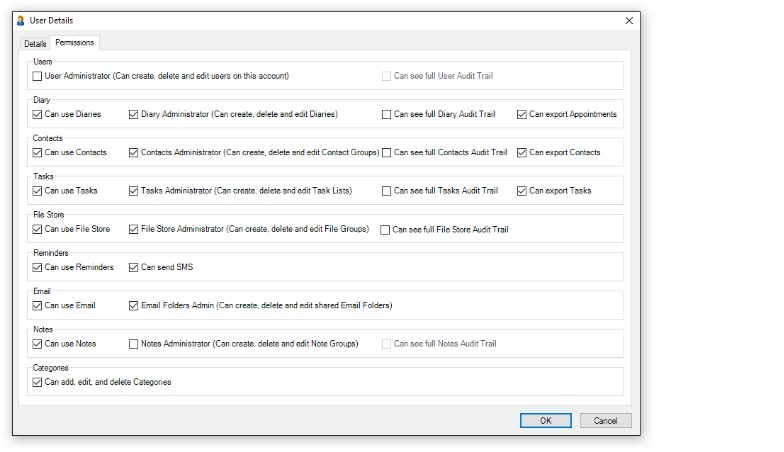
The permissions tab allows you control what parts of the MyOffice system your users have access to. This is important as it allows you to keep sensitive data safe and private, and also prevents users from accidentally altering the structure of your data. The screenshot above shows the "Permissions" tab of the user details dialog. For further information on user permissions, read Understanding User Permissions.
Once you're happy with the details you've entered for your new user, press the "OK" button to create the user.
Editing Users
Existing can be edited by double clicking on them in the User Admin dialog. From here you can alter any details pertaining to the user in question. However, remember that if you change their user name or password then you'll need to inform the person who's logging on as that user of the changes, otherwise they will be unable to log on.
Any changes made to users will be recorded in the Audit trail. This means that if a user has been altered in error, you can find the previous details of the user and revert if needs be.
Deleting Users
Users can be deleted from the User Admin dialog by selecting them in the list, then clicking the "Delete" button. Records of deleted users are also stored in the Audit Trail, so it's possible to recover the details of users who've been accidentally deleted.
