 Integrated
  Shared
  Task
Task  Cloud
Cloud  Shared
  Powerful
  Support
  Tutorials
  Trouble
  Hints
Hints  Frequently
  Contact
 How to create and
share calendars
In this walk-through, we'll show you how to create a Calendar and share it with other users in your account. We'll then show you how to control which users in your account can see the Calendar, and which can work with it. Once you've mastered sharing Calendars, you should be able to work the sharing system for Contact Groups, Email Folders and Task Lists and Planners, as they work according to the same principles.
For the purposes of this walk-though, we'll be using the Windows app. The Mac app works virtually identically, so the same principles can be applied if you're using that.
Step 1 - Create a Calendar
Run the MyOffice Windows App as per normal. If you've got MyOffice configured to show the Calendar window on startup (as it is by default), then you'll already be in the right place. If not, then click the "Calendars" button on the toolbar, or select "Calendars" from the "Window" menu to show the Calendar window.
With the Calendar window now showing, open the Calendar Admin window. This can be accomplished by selecting "Calendar Admin" from the "Tools" menu, or by right-clicking in the Calendar Tree on the left side of the Calendar window and selecting "Calendar Admin" from the context menu.
If you can't see the Tools > Calendar Admin menu option it means that you don't have Calendar Admin capability and you need to talk to your Account Administrator who can give you this capability.
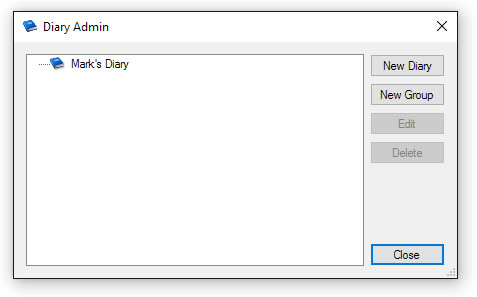
Your Calendar Admin window will look something like the above screenshot, with the obvious difference that yours will contain different calendars. All Calendar Admin functions are performed through this window, so it's well worth remembering how to get to it if you're likely to be altering your calendars on a regular basis.
To create a calendar, either press the "New Calendar" button in the top right corner of the "Calendar Admin" window, or right-click in the Calendar tree, then select "New" and "Calendar" in the context menu. The following window - the Calendar Details dialog - will now appear.

Now enter your preferred name for this Calendar in the "Calendar Name" field. Before you click "OK", take a look at the text in the middle of the dialog, below the "Display Events in a custom colour" fields. This shows that the Calendar you are about to create will be shared with all the users in your account, and those users will be able to both "read" from it and "write" to it. For those not familiar with permissions systems, "Read" (or "Read Only") means a user will be able to see the data in the Calendar in question, but will not be able to alter it. "Write" (or "Read\Write") means a user will be able to be both see the data, and also edit it. Now, click "OK".
The Calendar you've created will now appear in the Calendar tree in the "Calendar Admin" dialog. If you now close the "Calendar Admin" dialog (click "Close" in the bottom right corner), you'll see that the calendar has appeared in the Calendar tree in the main Calendar window, with a small green Calendar for its icon. The green calendar icon means you can write to the calendar. If the icon was red, it would mean you could only read the calendar, but were not allowed to alter its contents.
Because this Calendar was set up to allow all users on your account to have read and write access to it, all other users in your account should be able to see this Calendar and work with it. If you want to test this, close MyOffice, and log on as another user in your account. You should see the Calendar you created in exactly the same place as you created it. If you want to continue to work with your Calendars' permissions, close MyOffice and log on with the user you were using initially.
Tip - If you're not sure which user you've connected to MyOffice with, open the "Help" menu and select "Who am I?". This will show you which user (and account, if you have more than one) you are currently connected to MyOffice with.
Step 2 - Controlling Calendar Access Permissions
Now we've created a Calendar, and we've got it shared with all the other members of the account, it's time to restrict which members of the account can work with the Calendar.
First, open the "Calendar Admin" window again, then open the Calendar for editing. This can be done by double-clicking on the Calendar in the Calendar tree, selecting the Calendar in the Calendar tree and pressing the "Edit" button, or by right-clicking on the Calendar in the Calendar tree and selecting "Edit" from the context menu.
Once the Calendar Details dialog is open, select the "Permissions" tab. You'll see a checkbox at the top of the tab page called "Assign security permissions to this Calendar". It is currently unchecked. When there is no check in this checkbox, all the users in your account have read and write permission for the Calendar in question.
To begin assigning security permissions to this Calendar, check this checkbox. This can be accomplished by left clicking the checkbox.
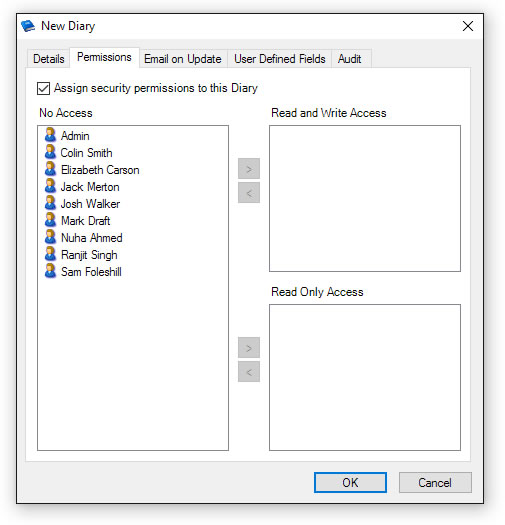
With the checkbox checked, three lists appear on the Permissions tab. These are named "No Access", "Read and Write Access", and "Read Only Access". Users listed in the "No Access" list are unable to see this Calendar, those in the "Read and Write Access" list can see the Calendar and create, edit and delete events in this Calendar, and those in "Read Only Access" can see the events in this Calendar, but cannot change them. As we can see, when we first check the "Assign security permissions to this Calendar" checkbox, all the users in the account are in the "No Access" list, so if we press "OK" now, no-one will be able to see the Calendar.
To change the permissions for a given user, the user in question should be moved to the appropriate list. This can be accomplished either by dragging the user to the desired list (select the desired user, hold down the left mouse button, and move the cursor over the desired list, and let go of the left mouse button), or by selecting the desired user and pressing the arrow button that points towards the desired list.
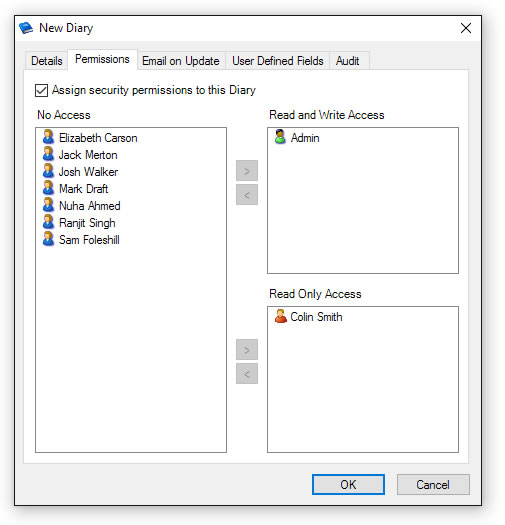
In the example above, the user called "Admin" (which, in this example, is me) has been moved to the "Read and Write Access" list, and the user called "Colin Smith" has been move to the "Read Only Access" list. When "OK" is pressed, this Calendar will not be visible to all the users in the "No Access" list, Colin Smith will be able to see the Calendar and any events therein, but will not be able to alter the events, and the Admin user will be able to see this Calendar and create, edit and delete any events in this list.
