 Integrated
  Shared
  Task
Task  Cloud
Cloud  Shared
  Powerful
  Support
  Tutorials
  Trouble
  Hints
Hints  Frequently
  Contact
How to create and share
calendars on mobiles
In this walk-through, we'll show you how to create, share, and administer calendars using your smartphone. For the purposes of the exercise, we'll be using the Android app. The process of creating, sharing, and administering calendars using the iPhone app is very similar.
Step 1 - Create a Calendar
Open the MyOffice app whilst connected to the internet. From the main menu, touch "Admin", then "Calendars" in the admin menu to open up the Calendar Admin activity. If you are unable to see the "Calendars" admin option then you lack Calendar Admin permission.
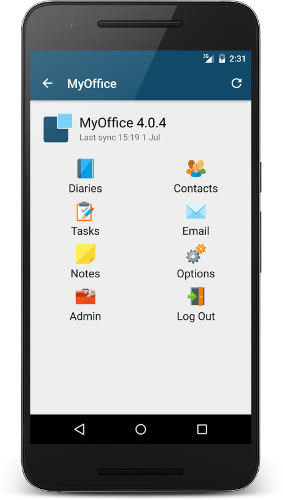
Main Menu
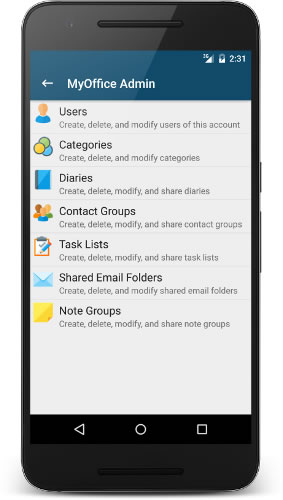
Admin Menu
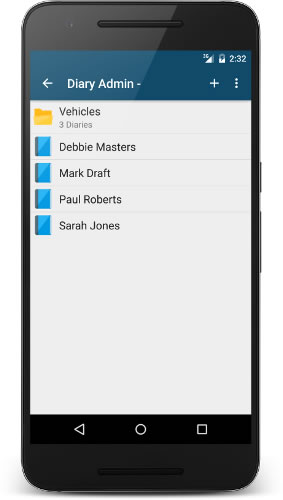
Calendar Admin
Your Calendar Admin activity will look something like the screenshot above on the right hand side, with the obvious difference that yours will contain different calendars. All Calendar Admin functions are performed through this activity, so it's well worth remembering how to get to it if you're likely to be altering your calendars using a smartphone on a regular basis. It should be noted that Calendar Admin is easier to accomplish with the Windows or Mac apps, although all functionality associated with Calendar Admin is available on Android and iOS.
To create a calendar, press the plus sign in the top right corner of the "Calendar Admin" activity. The following activity - the Calendar Details dialog - will now appear.
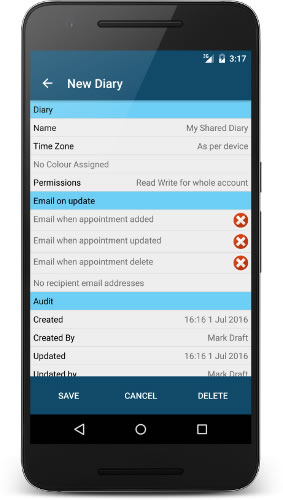
Now touch the "Name" field and enter your prefered name for your new calendar. If you want to set a timezone for this calendar, touch the "Time Zone" field and choose the required timezone - leaving the "Time Zone" field unchanged will mean the calendar is displayed in the default time zone for your device. To set the default colour for events entered in this calendar, touch "No Colour Assigned" and selected your prefered colour. Once you're happy with your calendars's settings, press "Save" to create the calendar.
The calendar you've created will now appear in the admin calendars list. In order to use the calendar on your mobile device, you'll need to go back to the main calendars list, choose "Select Calendars to Sync", and choose the dates between which you wish to sync the calendar.
The calendar you've created is set up to allow all users on your account to have read and write access. This means that they can view and edit its contents. If you want to restrict which of your account's users have access to this calendar, proceed to Step 2.
Step 2 - Controlling Calendar Access Permissions
The calendar we've just created has been set up to be available to all users on the account as a read and write calendar. This means all users on the account and create, edit, and delete events in the calendar, and also read it's contents. Now let's restrict which members of the account can view the calendar, and also which users can alter it's contents.
If you're not already viewing the calendar admin activity, navigate back to it using the instrutions above. Once you're there, open the calendar we've just created for editing by pressing on the calendar in the list then pressing the "Edit" button.
You'll see an item in the calendar detailed called "Permissions" with the words "Read Write for whole account" next to it. This tells us that all users in the account have read write access to the calendar. Tap this text and the heading "Permissions" will appear, plus a list of users will appear in the calendar details towards the bottom of the screen. The users will have traffic lights next to their names, all of which are currently set to red. Scroll the screen down a little bit at this point if you need to - this will let you see more of your users.
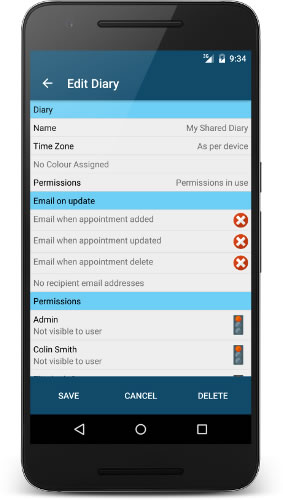
To change the permission for a given user, tap the user's name in the list. Tapping the name will toggle permissions for the user in question between "Not visible to user" (denoted by a red traffic light), "Read only for user" (denoted by a yellow traffic light), and "Read Write for user" (denoted by a green traffic). Keep tapping users until you've set up the permissions you require. Once you're happy with the permissions you've assigned, press the "Save" button to save the changes you've made to the calendar.

In the example above, we've assigned "Read Write" permission to the users "Admin" and "Elizabeth Carson". This means that Admin and Elizabeth Carson will be able to not only see the contents of the calendar, but also alter them. "Jack Merton" and "Josh Walker" have been set up with "Read Only" permission, and so are able to see the contents of the calendar but are unable to alter them. The calendar is invisible to the rest of the users on the account.
